
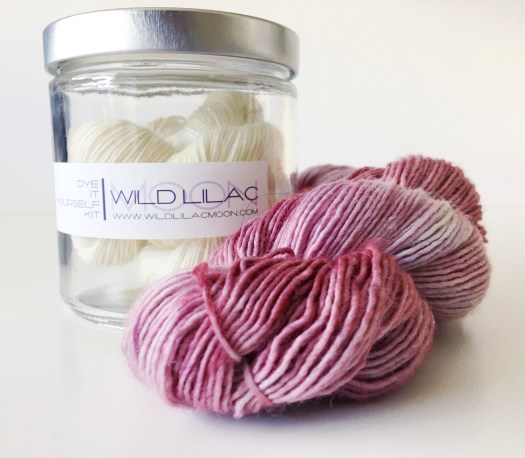
If you purchased one of my DYE IT YOURSELF KITS you might find yourself here to explore. If not these are also good instructions for the mason jar dye method.
Included in this DIY kit:
- One skein of yarn
- Dye package Dye
- container
- Instructions
What you need:
- 1 pair of rubber gloves
- 1 Particle Protective Mask
- Plastic Spoon
- Saran Wrap
- Microwave or steamer
- Water
Instructions:
Presoak your yarn, by submerging it in lukewarm water for a few minutes, then give it a good squeeze to get rid of the excess water. The yarn should be wet but not dripping. To avoid felting do not use water that is too hot and avoid a lot of agitation, this applies specifically to fibers that are not labeled super wash. I personally like to use what I have and not use to many utensils that I end up cleaning later, so I like to fill up the jar that came with the kit with water and presoak the skein in it. Drain, and squeeze out the skein.
Next step: put on your rubber gloves and particle mask and pour the package of dye into the same empty container, fill your container with a cup of hot water (it should be hot but not boiling), stir well with a plastic spoon until all dye is dissolved, this is important because dye particles settling at the bottom of the jar will give you very dark blotches.
You can now take off the mask but leave the gloves on for the next step.
The dye included in this kit is an all in one dye which has an acid component and a leveling agent essential to stabilize the dye bath at the correct ph level. Now that the dye is completely dissolved, gently push your wet skein of yarn all the way into the container until it is fully submerged [for alternative methods see “Tips” below]. Be careful the water will be hot! This will give you a gradient color skein since the wool that hits the dye first will soak up more dye than the top layer of the skein. This method is not meant to achieve an overall uniform color.


Let the skein sit in the container until the remaining water looks clear and all dye is absorbed. If you are unsure, about the time it takes to cool the yarn down is usually sufficient. Don’t worry if there is a little color left in the water, that is OK.
While you are waiting for this to happen, lay out a layer of saran wrap about 4 inches longer than the length of your skein on a flat surface. Once the skein is cool enough to handle, gently squeeze out most of the water, place the dyed skein on your saran wrap, roll them up like a burrito, fold over both overlapping ends and roll them into a coil [photos below]. It is important not to wrap a dry skein or you will damage the wool during the heat setting process! To set the dye you need a microwave that you do not use for food (for safety reasons you should not use any utensils you use for dyeing again for food preparation) or a pot with a steamer. If you use a microwave, place the coil on a microwave safe plate and heat it on high for 1 minute 30 sec, wait a few seconds and heat it again for another minute.


If you steam it, bring the water to a light simmer, place the coils in your steamer basket and simmer for about 20-30 min. And again do NOT use anything you used for dyeing again for food preparation!
Be careful not to handle the skein coils with your bare hands, they are extremely hot! Wait for them to cool completely before you unwrap them. Once cooled, rinse the yarn in some tepid water in the sink, not under running water (this can felt your wool), squeeze out the excess water and hang them to dry.
Remember always use caution when working with dye powder and hot liquids!
Tips:
You have a few options when you submerge your skein. You can submerge it vertically and leave a bit sticking out at the top, this will give you a bit of white and a lot of variation in color depth.
You can open it up and push it in wildly for a different look.
You can sprinkle a second color onto the yarn about every twist when you submerge the skein, which will give you color spots throughout.
You can choose to sprinkle the dye packet on the skein before submerging it into the water filled jar, this means you need to place it on a covered surface and keep your mask on while doing so. After this is done roll the skein up and let it soak the same way as described above.
You can use less dye to achieve an overall lighter shade.
Or you can wind the yarn into a cake submerge it or put the cake into the jar and then pour the prepared dye over it (this means you need a second disposable container to mix the dye).
If you experiment and find some new and exciting ways, let me know and I will add them to the list!
This kit comes with a free pattern that utilizes the skein of yarn you just dyed (fingering weight) and is available in my Etsy shop. Feel free to check it out!


